Submitting Jobs on ARC Clusters
- Understanding Compute Resources on ARC Clusters
- How SLURM Manages Jobs
- Example Job Script:
submit_job.sh - Submitting Jobs
- Monitoring Jobs
- Tips, Tricks, and Best Practices
Understanding Compute Resources on ARC Clusters
When you first log into an ARC cluster, you are on a login node. However, login nodes are not meant for computations—they are for file management, job submission, and other lightweight tasks. To run computations, you need to submit a job to a compute node using a job script.
On ARC clusters, job scheduling is managed by SLURM (Simple Linux Utility for Resource Management). SLURM schedules and allocates compute resources based on job requests.
How SLURM Manages Jobs
A SLURM job goes through four main stages:
-
Job Submission: A user submits a job using the
sbatchcommand. SLURM then assigns a unique job ID (an 8-digit number). -
Job Scheduling: SLURM checks available resources and priority queues. Jobs are scheduled based on factors such as resource availability, priority, and fairness policies.
-
Job Execution: SLURM allocates the requested resources. The job runs on the assigned compute node(s).
-
Completion & Monitoring: Users can monitor their job status with
sq. Output and error logs are saved in files namedslurm-<job ID>.out.
Example Job Script: submit_job.sh
Below is an example of a basic SLURM job script:
#!/bin/bash
#SBATCH --account=my_account    # Account name
#SBATCH --job-name=my_job       # Name of the job
#SBATCH --ntasks=1              # Number of tasks
#SBATCH --mem=4G                # Memory allocation
#SBATCH --time=00:01:00         # Max runtime (HH:MM:SS)
#SBATCH --gpus=1                # Number of GPUs (if needed)

# Load required modules
module load python/3.10 cuda cudnn

# Set up a temporary virtual environment on the compute node
virtualenv --no-download $SLURM_TMPDIR/env
source $SLURM_TMPDIR/env/bin/activate

# Upgrade pip and install necessary packages using cluster-optimized wheels
pip install --no-index --upgrade pip
pip install --no-index tensorflow

# Run the Python script
python main.py
Components of a Job Script
-
Shebang (
#!)
The shebang Specifies that this script should be executed using the Bash shell. #SBATCHDirectives
#SBATCHdirectives are special directives used in SLURM job scripts to specify resource requests and job settings. These directives tell the SLURM scheduler how to allocate resources and manage the job. Each#SBATCHdirective must be placed at the top of the script, before any executable commands:#SBATCH --option=valueDirective Description #SBATCH --account=my_accountSpecifies the account for computing resources. #SBATCH --job-name=my_jobAssigns a custom name to the job for easy identification in squeue.#SBATCH --ntasks=1Defines the number of tasks (processes) to run. Used for parallel jobs. #SBATCH --cpus-per-task=1Requests 1 CPU core per task. Useful for multi-threaded applications. #SBATCH --mem=4GRequests 4 GB of RAM for the job. #SBATCH --time=00:05:00Sets the maximum runtime to 5 minutes (HH:MM:SS). Jobs exceeding this time are automatically terminated. #SBATCH --gpus=1Requests 1 GPU. #SBATCH --output=job_output.txtRedirects standard output ( stdout) tojob_output.txt.#SBATCH --error=job_error.txtRedirects error messages ( stderr) tojob_error.txt.- Loading Required Software
module load python/3.10 cuda cudnnmodule load: Loads the necessary software for the job.python/3.10loads Python 3.10cudaandcudnnload GPU acceleration libraries for deep learning.
- Creating a Virtual Environment
 virtualenv --no-download $SLURM_TMPDIR/env
 source $SLURM_TMPDIR/env/bin/activate
These lines create a virtual environment in
$SLURM_TMPDIR, which is a temporary storage directory on the compute node. Compute nodes have very fast read and write speeds, making$SLURM_TMPDIRfaster than theHOMEdirectory.It is also a good idea to extract any data used in your script to
$SLURM_TMPDIR.tar -xf data.tar.gz -C $SLURM_TMPDIR/This command extracts files from the archive
data.tar.gzto the$SLURM_TMPDIR. - Installing Packages
 pip install --no-index --upgrade pip
 pip install --no-index tensorflow
These lines ensure package installations used pre-built wheels that are optimized for the ARC clusters.
pip install --no-index --upgrade pip: Upgradespipwithout accessing external repositories.pip install --no-index tensorflow: Installs Tensorflow using pre- built cluster wheels.
- Executing Scripts
python main.pyThis line runs the Python file
main.py, which is in the working directory when the job starts. The script,main.py, trains a neural network to recognize handwritten digits using the MNIST dataset.
Submitting Jobs
- Submit a job using
sbatch:sbatch <job_script.sh> - Check job status with
sqorsqueue:sqor
squeue -u $USER$USERis an enviroment variable that represents your username.sqandsqueue -u $USERare equivalent commands.
JOBID: is the unique 8-digit identifier assigned to the job.USER: represents the CCDB username.ACCOUNT: is the account name, which is assoicated with a PI.NAME: is the name of the job. But default it will be the name of the job script.ST: the state of the job (e.g.,PDfor pending andRfor running).TIME_LEFT: is the amount of time remaining before the job reaches its allocated time (--time).NODES: is the number ofcompute nodesrequested in the job script.CPUS: is the number of CPU cores requested in the job script.TRES_PER_N: is the allocated trackable resources (TRES) per node, such as GPUs or memory.MIN_MEM: the minimum amount of memory requested per node.NODELIST (REASON): the compute nodes assigned to the job, or if the job is pending, the reason why (e.g., waiting for resources, priority, dependency).
- View job logs (once completed) using:
cat slurm-<job_id>.out - Check job efficiency using:
seff <job-ID>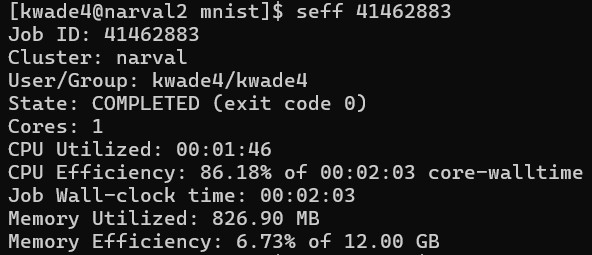
This output can help you in figuring out how much time amd computing resources your job needs.
Monitoring Jobs
ARC clusters such as narval have user portals, which offer a visual interface for viewing job statistics. To view usage information, go to Account>Job Stats
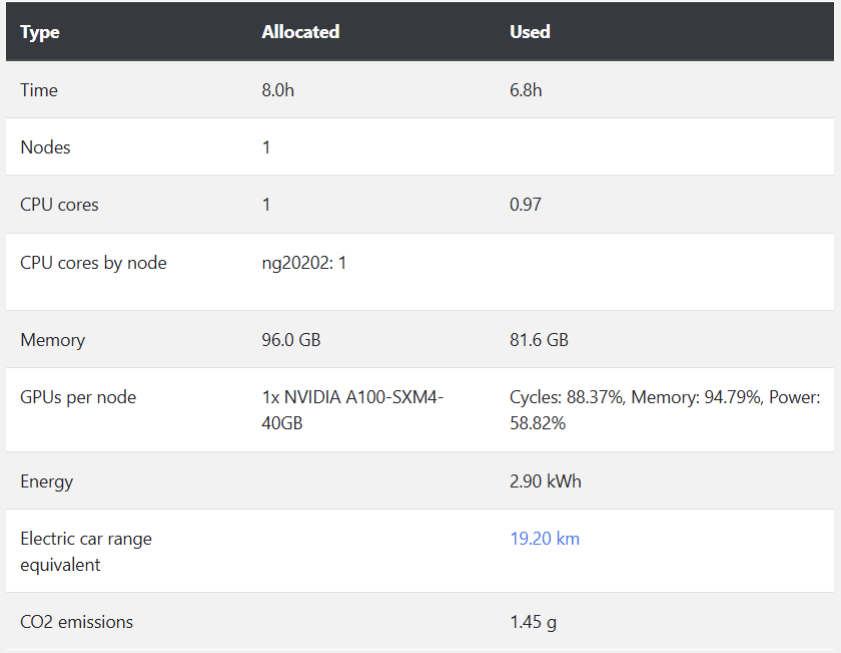
You can also view energy consumption and carbon emissions associated with each job.
The user portal also allows you to monitor your group’s priority.
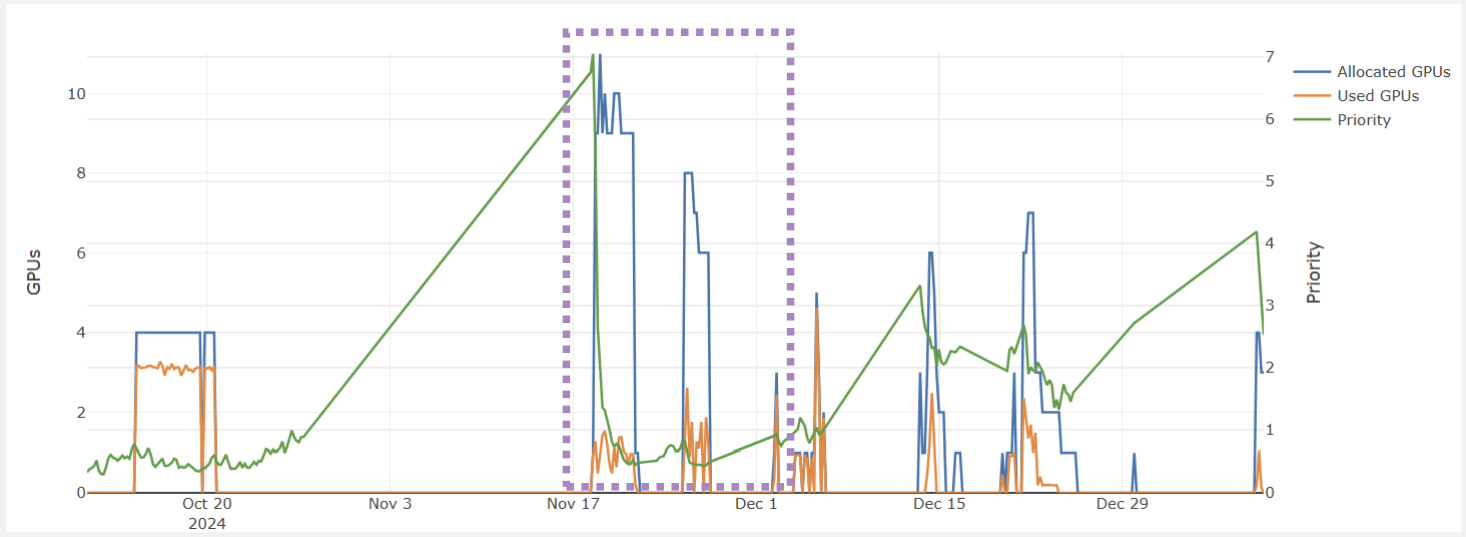
The purple box in the graph above shows the group’s priority (shown in green), which is relatively high. However, When many resources are allocated (represented by the blue line), the priority sharply decreases. This drop is intentional to ensure that other groups have the opportunity to access their fair share of resources. The orange line represents the actual resources used, which is much lower than what was allocated. Had this group been more responsible in their resource allocation, the priorty would not have decreaed as dramatically.
Tips, Tricks, and Best Practices
Choosing the right amount of CPU, memory, and runtime for your jobs can involve trial and error, especially when running a job for the first time. Below are some best practices to improve efficiency and minimize queue times:
⚠️ DO NOT Run Computations on Login Nodes
- Always use
sbatchto submit jobs to compute nodes. - The login nodes are meant for storing code files, small parameter files, and job scripts only.
✅ Request Only the Resources You Need
- Requesting too many resources can increase queue time, while requesting too few can lead to job failures and can reduce the paralellization.
- Start with a reasonable estimate and adjust based on job performance.
- Jobs with shorter time limits and fewer resource requests often start sooner because they can fit into scheduling gaps.
🔄 Test with Small Jobs First
- Before running large-scale jobs, test with a small dataset and shorter runtime to ensure your script works correctly.
- Some clusters, like
narval, offer multi-instance GPUs, which allow a single GPU to be divided into multiple partial units. This can help reduce wait times during testing.- Example:
--gres=gpu:a100_1g.5gb:1: specifies using 1 NVIDIA A100 GPU with 5GB of memory.
- Example:
🛠 Add Checkpoints to Your Code
- Checkpoints allow your job to restart where it left off in case it gets interrupted, preventing the need to start over from scratch. This is especially helpful for long-running jobs or jobs on shared resources.
- Checkpoints are also useful for debugging, as they allow you to inspect the state of your job at various stages of its executio
💾 Optimize I/O Operations
- Reading and writing many small files to the disk can be slow and inefficient. Minimize I/O operations where possible.
- Compress large datasets into
ZIPorTARfiles. - When working with large datasets, extract them into
$SLURM_TMPDIR/(the temporary directory on the compute node).$SLURM_TMPDIRoffers fast, local storage and prevents bottlenecks associated with shared disk access.
📊 Monitor & Adjust Resource Usage
- Check job usage with
seff <job_id>or the user portal to see if your job underutilized or exceeded requested resources.
📧 Set Up Email Notifications
- You can receive email notifciations about the status of your job.
-
Add these lines to your job script to receive notifications when your job starts, ends, or if it fails:
  #SBATCH --mail-user=<user@email.com>
  #SBATCH --mail-type=ALL